Microscope Cameras
Model overview
We offer microscope cameras from several manufacturers and for various applications - from the eyepiece for tarinig at the school to highly sensitive HDMI cameras for darkfield investigations. Most models are equipped with software which supports measurements, time lapse and further specialized functions. We can advise you and propose you a solution for your application - just send us an email with the information about how you plan to use the camera!
| Brand/Model | HDMI mode |
USB mode | Resolution | fps [1] HDMI/USB |
|---|---|---|---|---|
| ZEISS/Axiocam 212 color | ✔ | ✔Windows | 3840x2160 | 30 / 17 |
| ZEISS/Axiocam 202 mono | ✔ | ✔Windows | 1920x1080 | 30 / 27 |
| Tucsen/Truechrome 4K Pro | ✔ | ✔ Windows, macOS | 3840x2160 | 30 / 20 |
| HDC/DF4L | ✔ | ✔ Windows | 3840x2160 | 30 / 20 |
| HDC/DF2 | ✘ | ✔Windows | 3840x2160 | - / 45 |
| Tucsen/TruechromeAF | ✔ | ✔ Windows | 1920x1080 | 60 / 30 |
| Tucsen/HD-Lite | ✔ | ✔ Windows | 1920x1080 | 15 / 15 |
| Dino-Lite/AM7025X | ✘ | ✔ Windows, macOS | 2592x1944 | - / 30 |
| Dino-Lite/AM4025X | ✘ | ✔ Windows, macOS | 1280x1024 | - / 30 |
Operation modes of microscope cameras
- USB mode - This was the usual operation mode of microscope cameras. The cameras are connected to the PC via the USB interface, but require the initial installation and an ongoing updating of the application software.
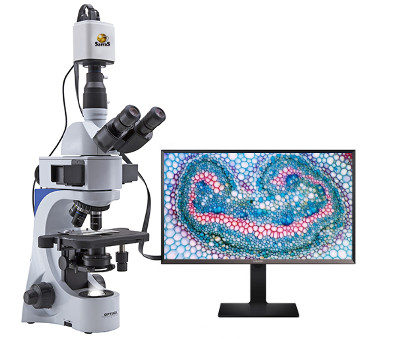
- HDMI mode - Microscope cameras that support this mode deliver their signal directly to the HDMI input of an HDMI-capable monitor (see image below) - HDMI microscope cameras can therefore also work without a PC. In addition to the high picture quality in HDMI mode, there is no need to install and update user software and drivers - as this is the case with USB-mode cameras. The camera is controlled in a menu that is displayed on the screen by the camera. User interaction is done with a mouse attached to the camera. The documentation of images/videos is done on a removable SD card or USB stick. Almost all of the HDMI cameras we offer also have a USB output - this means that alternative USB operation is also possible.
- Network mode - For special applications where the user must be located far away from the microscope or the live image has to be made available in real time, e.g. to another department on another floor, there are microscope cameras that support communication over the network. The camera is connected to the company's local area network (LAN) via a built-in LAN adapter - a user with a PC in the same LAN can view the live image in the application installed on his PC.

How to connect a c-mount camera to your microscope
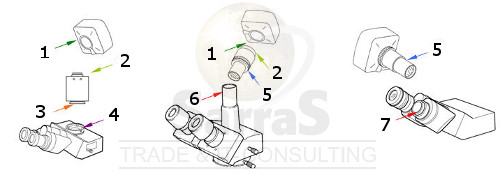
A c-mount camera can be connected using one of the three methods shown below. If you own a trinocular microscope and also the c-mount adapter of its manufacturer (left), the c-mount thread of the camera (1) on the c-mount adapter (2) is connected. If you own a trinocular microscope with a third ocular tube (center) you will need an adapter which has at the one end a tube (5) with the diameter of your ocular (e.g. 23 mm) and at the other end, a c-mount thread (2). If you have a binocular microscope (right) then you need to remove one eyepiece (7) and insert there the camera-adapter combination.
How can i find the right c-mount adapter?
C-mount adapters can be found in our online shop under "Adapters and calibration slides". To be sure that the c-mount adapter is the right one for your microscope, you can email us your microscope type, the inner diameter of your trinocular tube and the desired camera. We check the compatibility with the camera manufacturer's technical support for you - for free within a few business days.

 Deutsch
 English